


You can buy shrink plastic at pretty much any art store, or order it online. You can use it to make keychains, earrings, pendants, pins, hairpins, really whatever your heart desires. There’s also kits you can buy online that have the shrink plastic as well as keychain materials, ear hooks, and pin backings. In this mini how to, I will demonstrate how I go about making a keychain charm out of shrink plastic.

The first thing I did was print out the drawing I want onto paper, since the shrink plastic I have is clear this makes it easier to get the drawing exactly how I want it. If your design has color within
the design that you want consistent if you make multiple, you should print in color if you can.
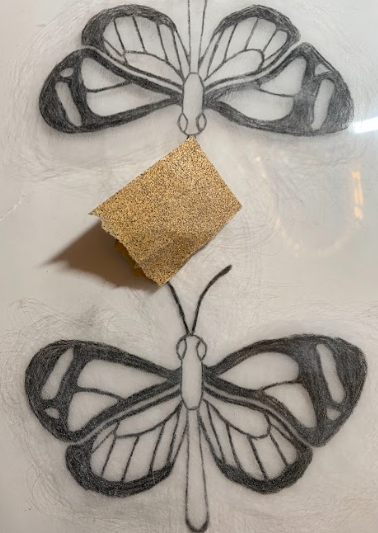
Then for drawing on the surface you can use sharpies or acrylic markers, but I like using colored pencils more so that means I scratch the shrink plastic with some sandpaper before drawing on the surface. If you want to use colored pencils but are nervous about the scratches from the sandpaper, just know that once shrunk the texture is still there, but it is much less noticeable than when at full size.

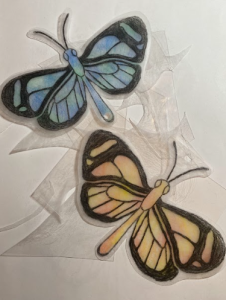
For this one, I wanted color on the back side so it could peek through the clear spots on the front.
So I used the sandpaper on the other side as well, then colored them.
After drawing and coloring, I hole punch the design and cut it out with a little border. (Note: you don’t have to have a border. I just like this look more.) Preheat your oven to 325 degrees, and line your baking sheet with aluminum foil, then place your designs onto the pan and put in the oven once preheated. (If your shrink plastic has different directions, follow those instead.)
Then wait anywhere between 1–3 minutes, you’ll know it’s ready to come out once they look flat. And don’t worry, it’s normal for the design to curl up* and move abstractly before it flattens out. Once you decide they’re ready to take out, have something nearby to press them onto the pan with. This ensures that they’re as flat as possible.

* I know I said not to worry about the designs curling in the oven but do note that tragic accidents can happen 🙁
Since I colored on the back once it’s no longer hot, I covered it with a white acrylic paint pen. Then you could either leave it there then use some jump rings and a clasp, or some string, to make it a keychain. You could also apply some fixative to both sides of the design to pretty much ensure that it will never smudge and will be protected from the elements. Something like mod podge will do the trick.
Shrink plastic is a really fun and easy activity to do with people of all ranges of art abilities. It’s fun to turn your drawings into something usable, and it works great for personalized gifts!